Friday, November 22, 2013

iOS: Navigation Title Text Colour

To change the titles in all your navigation bars to white, add this code to the didFinishLaunchingWithOptions method in your app delegate:
NSDictionary *navbarTitleTextAttributes =
    @{ UITextAttributeTextColor:[UIColor whiteColor] };
[[UINavigationBar appearance] setTitleTextAttributes:navbarTitleTextAttributes];

iOS7: Scroll to Top

Should be simple right?
self.tableView.contentOffset = CGRectZero;
However, on iOS7 your tableView will end up with its top part hidden under the navigation bar. Instead, you need to do this:
self.tableView.contentOffset = CGPointMake(0, -self.tableView.contentInset.top);

Thursday, November 21, 2013

iOS: Gotchas

Here's a couple of things that tripped me up today while developing an iOS app:

1. Views Blocking Touches

If you drag a plain view onto your view controller in storyboard, it will stop all touches reaching views located underneath. You will need to ensure the User Interaction Enabled setting is unchecked if you want your touches to be passed through.

2. Tap and Drag Location Tracking

Storyboard lets you easily wire up your buttons to methods in your view controller that get called whenever a user taps or drags inside the button. If you use Storyboard to create the stub method for you by dragging in the connection to an empty space in your view controller, it will create a method like:
- (IBAction)editClicked:(id)sender;
However, you may want to know where the user touched. Fortunately, this is easily available - just ensure you select the Sender and Event option in the Arguments drop-down when create the connection in Storyboard. This will then auto-create a method in your header file like:
- (IBAction)editClicked:(id)sender forEvent:(UIEvent *)event;
You can then get the touch position with the following code:
NSSet *touches = [event allTouches];
UITouch *touch = [touches anyObject];
CGPoint pointTouched = [touch locationInView:self.view];

Monday, November 18, 2013

iOS: Selectively Exclude Animations

The animation framework in Apple iOS allows you to create amazing effects insanely easily. However, sometimes getting animations to work the way you want can be a tricky business.

I sometimes find things are animating when I don't want them to. Here's a quick bit of code to exclude certain actions from animating:
[CATransaction begin];
[CATransaction setValue:[NSNumber numberWithBool:YES] forKey:kCATransactionDisableActions];
//
// Add your action here
//
[CATransaction commit];

Saturday, August 4, 2012

Password-Free SSH on OS X Mountain Lion

I had set up my home network with password-free ssh access between various Mac computers. But when I recently upgraded to OS X Mountain Lion, this stopped working.

Turns out /etc/sshd_config is modified during Mountain Lion installation. The following line gets unchecked:

# The default is to check both .ssh/authorized_keys and .ssh/authorized_keys2
# but this is overridden so installations will only check .ssh/authorized_keys
AuthorizedKeysFile      .ssh/authorized_keys


Once I had renamed ~/.ssh/authorized_keys2 to ~/.ssh/authorized_keys on my Mountain Lion computers, everything worked fine again.

Friday, July 6, 2012

Send Emails via Gmail from Terminal in Mac OS X Server

It took me a while to figure this out, so I'm hoping it might save somebody else the trouble of scouring the web for the relevant info. You can send emails from the Terminal in Mac OS X with the following commands:
 mail recipient@somewhere.com
 <enter>
 Subject: Hi there!
 <enter>
 This is the body of the email.
 This is another line in the email body.
 <ctrl + d>
Note: <enter> means hit the enter key, and <ctrl + d> means type 'd' while holding the control key.

However, this won't actually send an email unless you have a mail server running. As far as I can tell, you have two options for setting up a mail server - either churn out a series of incomprehensible commands in a Terminal window, or use Mac OS X Server's Server Admin utility to configure the Mail Service using a (somewhat) friendly GUI.

I went for the latter option - I just wanted to get this up and running using my gmail account with the minimum of fuss. Unfortunately, it didn't work right off the bat - having configured the gmail smtp server along with my username and password, I was seeing frustrating "Timed out" errors in the logs and my test mails weren't getting sent. Turns out some ISPs block port 25 - so I needed to specify port 587 in the hostname. Then I was getting some even more meaningless errors along the lines of "Must issue a STARTTLS command first". I mean what is that? Thankfully, google to the rescue again - this great blog had all the answers.

Step-By-Step Instructions

1. Launch the Server Admin utility, located in Applications/Server

2. In the Settings tab, fill in the settings as per the screenshot below. The Domain name and Host name are ignored, so just fill in anything. The key settings are highlighted in red:

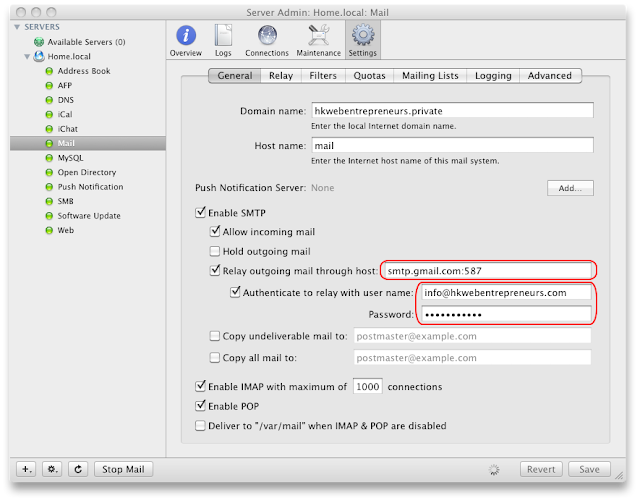
Note: the gmail account you specify in the "Authenticate to relay with user name:" box will be used as the From Address for all emails you send from the command line.

3. Add the following lines to /etc/postfix/main.cf (don't ask me why):
 smtp_tls_security_level = may
 smtp_sasl_security_options = noanonymous

That's it - you can now send mails from a Terminal window!

Update: Mountain Lion
30 Aug 2012

After upgrading to Mountain Lion and installing OS X Server, my mail stopped working. I had to make the following change to /Library/Server/Mail/Config/postfix/main.cf to get it working again:
# Change this line:
#smtp_sasl_password_maps = hash:/etc/postfix/sasl/passwd
# To this:
smtp_sasl_password_maps = hash:/Library/Server/Mail/Config/postfix/sasl/passwd

Hope it helps someone!

Update: Mountain Lion #2
23 Oct 2012

I've just had to reinstall OS X after a hard disk failure, and found that the above changes weren't sufficient to get command-line email working again. For Mountain Lion, after installing and starting OS X Server, and configuring the Mail service in the Server application to use the gmail SMTP relay, I had to do only the following on the command-line:
sudo vi /Library/Server/Mail/Config/postfix/main.cf
I changed this line:
# By default is 'no' so change to 'yes'
smtpd_use_tls = yes
And added the following two lines at the end:
# By default not included in the config, so add these lines
smtp_tls_security_level = may
smtp_sasl_security_options = noanonymous
After that, I stopped and started Mail using the Server application, and command-line email now worked correctly.

Friday, December 30, 2011

PostgreSQL Mac Preferences

Unlike many coders, I'm not overly fond of the command line. Yes it's quick, but only provided you can remember the commands!. Too often, I find myself hunting through obscure documentation (and StackOverflow...) to find the right command, even for relatively simple things.

I much prefer to use a GUI (ideally with keystrokes for invoking its frequently-used functions). Not only does it free me from the burden of committing pointlessly complex keywords and arguments to memory - it just feels nicer!

So it was when I made the switch from MySQL to PostgreSQL (due to an instinctive mistrust of the former's new corporate owners) that I was disappointed to find that PostgreSQL relies on the command line in a major way. A simple task like starting & stopping the server is far from a no-brainer - you have to find the relevant script, set the environment variables just so, and even switch to the right user (with some installations). Compare this to MySQL, which has a swish System Preferences screen for starting, stopping and enabling auto-startup.

Well, today I am pleased to announce the release of PostgreSQL Preferences for Mac OS X.


Please see installation instructions below, and be sure to check out the User Guide - although given the above rant, I'm hoping it's so intuitive to use that you won't need to look at this much!

So now you can happily avoid struggling with mundane activities like starting / stopping servers - and concentrate on the more important business of designing great websites!
Update 30-August 2015: Links and screenshots updated to latest version.